SET UP A SCANNER equipped with 32-bit drivers
and communicate with PhotoFiltre 11 - 64 bits
the software :

using EasyScan freeware.
To mark your line,
move this arrow :

The now legendary PhotoFiltre, Antonio Da Cruz's retouching software
is to day available in a 64-bit version under the name "PhotoFiltre 11".
It uses all the available memory, when 32-bit applications are limited to 3 Giga bytes,
and improves the fineness of images for opening RAW files in HDR quality.
In order to increase its compatibility with scanners equipped with 32-bit drivers,
not available to benefit from an upgrade, PhotoFiltre 11 can launch a third-party program,
which will be responsible for controlling the scanner and returning the acquired image to it.
If the software specific to your scanner can send an image to a retouching software,
you do not need this tutorial, enter the path of its "exe" file,
in "Digitize with ..." of menu "File / Twain Import" of PhotoFiltre 11.
We suggest here to configure EasyScan (freeware)
so that it returns a quality image in PhotoFiltre 11 in a very simple way.
1° Download EasyScan
You can download the file from this address :
http://micromeg.free.fr/Programs/EasyScan-Setup.exe
The short presentation of the software is also available here
http://micromeg.free.fr/progs.html#EasyScan
Detailed help is accessible in the software from the F1 key.
Run EasyScan-Setup.exe. The installation procedure is classic.
2° Opening EasyScan
2-1 Connect and switch on the scanner
The scanner running, avoids an error message and facilitates the identification of the source.
2-2 Open EasyScan
The software icon is not on the desktop. Go to the folder where the software is installed,
right click on the file EasyScan.exe / Send to / Desktop (create a shortcut).
On the Desktop, double-click on the EasyScan icon.
No worries, you can select another language in the Preferences menu.


2-2 Open EasyScan
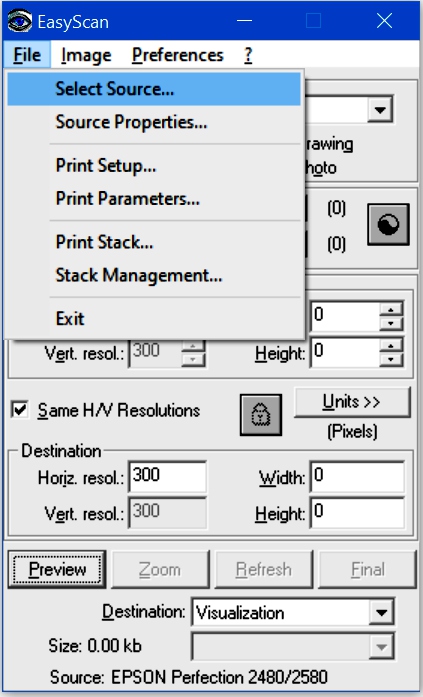
2-3 See the available sources
2-4 Select the source
2-3 See the available sources
When your scanner is recognized, its name is displayed at the bottom of the command window.
Otherwise, go to the "File / Select Source" menu to see the available sources.
2-4 Select the source
If you have difficulty with the sources, press the F1 key to consult the help.
For some scanners it will probably be necessary to configure the source in the Preferences menu.
The software overview page provides access to a list of scanners that have been tested.
3° Configure the Destination software


3-1 Preferences menu
3-1 Add software
3-1 Preferences menu
The source which will "acquire" the image is selected.
To return the image to PhotoFiltre 11, you must configure the Destination to this software.
Open the Preferences / "Applications Setup..." menu.
On the window that opens, click on Add.


3-2 Configuration of an external software
3-2 Configure for PhotoFiltre 11
3-2 Configure for PhotoFiltre 11
Title : Enter a fairly short name : Ex : PF_11
Program : click on the 3 small dots to indicate the path of PhotoFiltre 11. exe
Command line : -tempfile %f (This command is specific to PF 11.)
PF 11 processes the name of the received file to increment the name of any subsequent pages.
File Format : Prefer a lossless, uncompressed format.
Confirm on OK
Do not forget to validate the "Applications Setup" window where PF_11 is now displayed.
4° Use styles to memorize your parameters
EasyScan is a remarkable software, offering many possibilities of parameter settings,
it keeps the last parameters used, as long as the software remains open.
However, the command window loses most of them when it is closed.
To remedy this, let's use styles for different common uses.


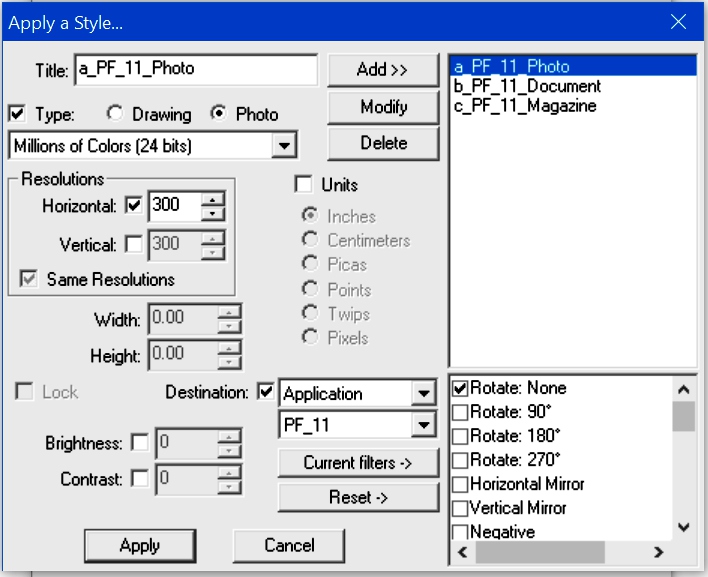
4-1 Applying a style
4-2 Creating styles in common use
4-1 Applying a style
On the main commands window (2-2), click on the "Apply a style" bar.
Title : name the style you will use most often, I suggest "a_PF_11_Photo".
Type : check the box, check "Photo", then "Million colors (24 bits).
Resolution : check "Horizontal", enter the value of 300 which is a DPI value (dots per inch),
check "Same resolutions", the images keep the same Wide/Height ratio as the original.
Units : leave the box unchecked, useful especially for Viewing in EasyScan.
Destination : check the box, choose "Application" in the drop-down list,
then in the list below, "PF_11", which we have configured in paragraph 3-2
Current filters : Rotation : None, Use channel : All, Descreen : None.
Very important : Click on Add , otherwise you will have to start over. 
4-2 Creating styles for common use
We have created a "Photo" style, for images acquired in 300 DPI, without descreening.
You can, for example, create a "Document" style, in a resolution of 150 DPI,
or a "Magazine" style, to record a level of descreening.
Using a_ or b_, c_ before the name of the style, will order the list.
When you have added the styles you need, close the window,
and close EasyScan, we will launch it from PhotoFiltre 11.
5° Scan from PhotoFiltre 11
5-1 Designate the third-party software
In PhotoFiltre 11, menu File / Import Twain / Digitalize with ...,
Specify the path of the "EasyScan.exe" file, as you installed it.
This operation is memorized by PhotoFiltre as long as you do not modify it.
5-2 Scanning an Image
Place the mouse pointer over the "Digitalize an Image" icon,  (EasyScan) is displayed.
This is the confirmation that the path to the third-party software has been saved.
Click on the icon to start scanning with EasyScan.


5-3 Opening the session
5-4 Opening the styles box
5-3 Opening the session
As you can see, the Destination parameters are not displayed.
Click on the "Apply a style ..." bar
5-4 Opening the styles box
Ditto, the last style used, nor any default style is displayed.
Select, with one click, the desired style in the list at the top right.


5-5
Selection of the applied style
5-6 Integration in the commands page
5-5 Selection of the applied style
We see that "Title" is filled in, the type : Photo / Million colors, Resolution : 300 DPI,
but in addition, the Destination is correctly designated, all in 2 clicks.
It remains to validate the window on the button "Apply".
5-6 Integration in the commands page
Return to the commands page, the essential information is confirmed,
including the parameters concerning the Destination.
We can start the preview, with a click on the "Preview" button.

5-7 Selecting the area to be scanned

Select the area to be scanned with the mouse pointer,
The "Final" button is now active, one click, and scanning is started.
The acquired image is returned to PhotoFiltre 11.

5-8 Scanning a new image
To scan a new image, all you have to do is go back to the task bar,
display EasyScan, which has kept all of its parameters, and restart a preview.
If you restart a scan from PhotoFiltre 11, while the EasyScan application is still open,
a second instance of EasyScan opens with an error message. Close this instance,
and in the taskbar, display the first instance of EasyScan, which is still valid.
If you close EasyScan completely, a new scan from PhotoFiltre 11 is always possible,
in this case, you will have to, again, in EasyScan, apply a style with Destination PF 11,
so that the acquired image is sent back, to PhotoFiltre 11.
---------
Thanks to Antonio Da Cruz, the generous and talented designer of PhotoFiltre and its variations.
Thanks also to Philippe Mignard, author of EasyScan who makes this very powerful freeware available to you.
If you have been able to find satisfaction in using your scanner from PhotoFiltre 11,
and appreciate some of the many services provided by EasyScan,
my happiness does not need more to use these two softwares,
and to share some little knowledge.
--- Tom ---